Saturday, July 7, 2012

Pulling a Vespa Engine

First of all I am going to again say that I am an not an expert (as may be obvious to some). I am an enthusiast who knows enough to possibly be dangerous. I welcome and appreciate any insight on any oversight. I am trying to keep a straightforward and hopefully thoughtful record of my endeavors, successes and setbacks. I hope someone out there finds it useful if not sort of interesting and amusing. 

That said, secondly, I would like to apologize for all the ugly arrows. 


It didn't occur to me to start taking pictures until after I had already removed the engine. I wish I had documented all of the individual cable connections. I will be sure to do that when I am replacing them. 

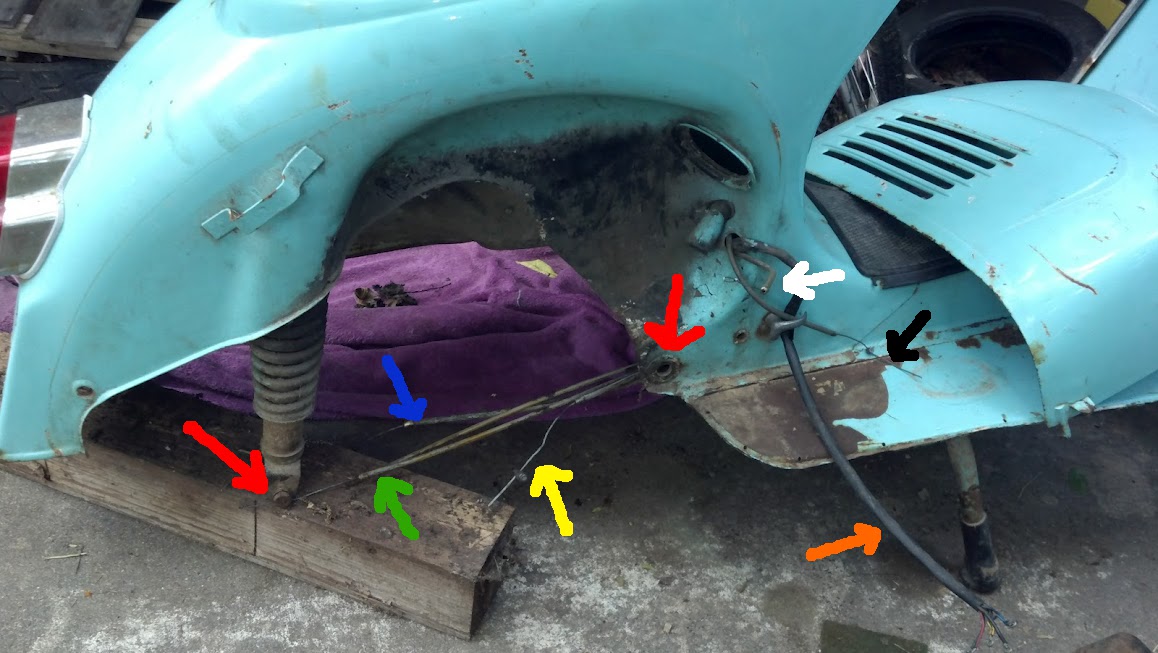
The blue arrow points out the clutch cable. Green points out the two gear shifting cables. One pushes, One pulls, One Handlebar controls them all. Yellow is the rear brake cable. Orange is the electrical wiring harness. Black is the throttle cable and White is the choke cable. I disconnected all of these before removing the engine. 

The red arrows show the mounting points for the engine. The hole in the body has a matching hole on the other side of the body. The engine has a mounting bar that fits between them and a long bolt which creates a hinge allows the engine to swing up and down. The rear mount is at the bottom of the shock. That's it. Once those bolts are pulled, the engine comes right out.


The engine and wheel pull away as one unit. You can see the mounting points to the left of the shifting box and all the way to the right above the end of the kick starter. The snail shell spiral look of the engine pleases me to no end. 


A grimy shifter box. 

There was a beautiful gross patina of oil dirt and (sorry) neglect covering the whole lower side of the engine. I probably should have dealt with that somewhat BEFORE I jumped in to pull the engine but lesson learned: Clean it up a little first.


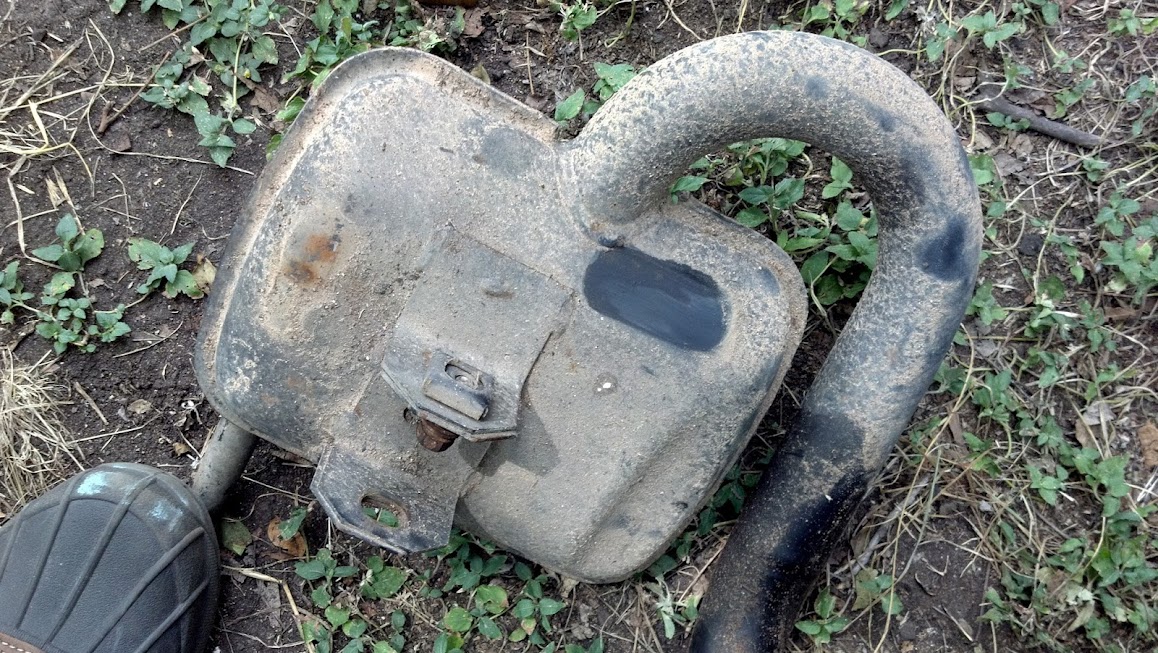
I started by pulling the muffler. It was only held on by a single bolt underneath. It had already been disconnected from the engine. It looked a little rough but with a little sweat dabbed from my forehead (hot day in Texas) I wiped a spot clean and saw this was all just dirt. I hosed it down and it looks pretty good.


This engine has a manual transmission with a clutch and gears. I took this picture to point out the clutch and brake levers under the engine and realized the picture was too dark and it was hard to see the clutch lever. I decided I would draw in some arrows and then sort of went overboard with them.

The red arrows point out the clutch lever and the cable adjustment nut. The green arrows point out the rear brake lever and cable adjusting nut. The blue is the Piaggio engine ID. The yellow arrows point out the fine gross oil/dirt/dreams/neglect patina I mentioned before. You don't want to see this side of the engine all that often. File that under "Keep the rubber side down".


The same color legend applies to the arrows in this "Hey I cleaned it Disco Sidelight" remix. Above the blue arrow you can see the exhaust port coming out of the bottom of the cylinder barrel.

To clean this up, I used compressed air to blow off any loose debris. This did about 3/4 of the work. After that I used an old toothbrush, spray carb cleaner and an old towel to remove the thin oily film that the compressed air just pushed around. As you can see from the yellow arrows that I am not done with the cleaning process but it's at least tolerable to bring inside to be worked on.


Once again, not a view you normally want to see on a well running scooter.


The reason again for removing the engine is to remove the cylinder and seized piston to be replaced/upgraded with a nice clean 150cc kit. Once I removed it, the piston arm was able to fully extend. This video shows how far it can travel. The easy and free movement is very encouraging as it means the engine itself is in pretty good condition. 


While I was looking it over, I stuck a file between the cylinder and block and then removed the flywheel. You can see it down on the ground behind the cylinder. See those little fan blades? Those things are SHARP! I got a nice little diagonal chomp across my finger while I was messing with it one day.

The plate with the copper-wound coils is the stator. This translates the movement of the engine into electricity. I wrapped the electrical box on the upper left with blue tape. This is where the electrical connection comes out of the engine. This older scooter has a 6V electrical system (unless it's been changed and I am not aware yet). I am going to look into converting this (and my other Vespa projects) to a 12V system which will allow for a battery, brighter head/brake/turn lights (LED conversion, I am no purist) and other possible accessories such as GPS unit, MP3 player, running lights and cappuccino machine.

It IS an Italian bike after all.

Treasure Chest?


Christmas morning?
Awesome puzzle?
Box of parts?
Back up plan?
Graveyard?

I guess it all depends on the level of enthusiasm.

This is the box full of the original parts from the VNB. I began reconnecting the cables today and was digging through the box for odds and ends. Down in the bucket was the original carburetor box and insides, the center stand which was replaced with a kick stand (that will go back on soon!), the mixing pitcher, the original 125cc cylinder and head, 2 flywheel covers (the third's from the VNC), an innertube, various spare cables, some squirrel bones, some grommets, the air intake bellows, various ziplock bags containing loose screws and jets and air filters, a shifter box, the ancient carb float, an unspoken history, the hopes and dreams of previous owners (cheers to them), a little box that whispers "EVIL!!" when you open it and a tube of liquid gasket. I believe there might also have been some random ETC...

Opportunity?
Delusion?
Adventure?
Lessons to be learned?
Shameful "take it off my hands" knowing full well it will be someone else's problem future Craigslist ad?
A challenge to be risen to?
A roaring classic down the road?
The banal topic of a navel-gazing level list of rhetorical questions that doesn't inform anyone of much?

What will make this run? The Gold Price or the Iron Price?
Winter's coming, William. Time to get working!

It's Scooter, Texas. It won't get too cold.

Friday, July 6, 2012

bigger piston, bigger bore

I picked up the '68 Vespa Super 125 knowing the piston was seized. As you can see in this video, the piston seized in the cylinder and they both move back and forth with the movement of the flywheel. 


I was helping Scooter Steve move more of his shop from Austin to Buda today. As we worked out way through piles of scooters and motorcycles and engines and tires and mufflers and such, Steve pulled out a box of cylinder barrels. Inside was this set. It's a 150cc and we checked it against the Super 125 when we got back to my house and it looks like it will bolt right on. There were some rings in with the piston but I will replace those along with some bearings while I am at it. 


On the left is the cylinder barrel. The flange off to the left fits inside the engine. The flange off the bottom is the exhaust. In the upper center is the piston which travels back and forth in the cylinder. The cap on the right is the cylinder head. The spark plug screws into the threaded hole. The pieces are bladed to help dissipate high heat from the cylinder. 


The piston is in pretty good shape if a little dirty with carbon on the top. 


The cylinder is nice and smooth. Scoring on the side would indicate a damaged piston or damaged rings. 


Here is the piston in the cylinder and the combustion chamber on the right. Vaporized air and fuel enter the cylinder as the piston is moving towards the spark plug. This compresses the mixture and the spark from the plug ignites it. BOOM! The piston is pushed back down the cylinder. 
With bad rings or a damaged cylinder, the fuel/air mixture could not be compressed as tightly and the combusting fuel on the opposite stroke could escape past the rings causing less power pushing the piston back.


This stuff seems like it's in good condition. Now to remove the old cylinder and piston. Steve and I are going to try a C-Clamp style tool to manually push the piston out. Then it's just a matter of cleaning it up, setting it straight, lining it out, doing the work, killing some chickens, washing some hands, maybe some beer.


Thursday, July 5, 2012

House Call


I got a request for help. Her Stella wasn't running. It had been knocked over and had been sitting for awhile. I couldn't see any oil down in the reservoir so I went and bought some right away. I also bought a little ratcheting right angled screwdriver thing. I am not sure how you are expected to get the screws off the carburetor box lid with a regular screwdriver. Refilled the oil reservoir and cleaned out the carb jets for good measure. Still didn't fire up so I checked the spark plug. It was completely fouled. Changed that out and it started up on the second or third kick. I let it idle for awhile and it just puttered away quietly. I installed a charging harness on the battery and reinstalled the spare tire. All pretty easy and she was happy. It should be good to go + instructions to call me if there's any troubles. Stellas are beautiful bikes. It was a pleasure to work on it.

The owner was cute too, so that was nice.

A case for the VNB

A question was brought up as to whether the Vespa 125 VNB I got recently might be a made-over Allstate. If you aren't familiar, the American department store chain Sears sold Vespa (and Cushman) scooters under the brand name Allstate from 1948 to 1966. You can still find these scooters here and there. The reader pointed out that the square speedometer was different from other Vespa models at the time. I did some research and made the following case:


A. The black and white pic is from the book "How to Restore and Maintain your Vespa". It says the 125s got the square speedo. The color pic is mine from this morning. Looks exactly the same as the one in the book.


B. Look at the rivet holes for the Vespa badge. No welded over Allstate badge holes that I can see.


C. The VIN is VNB4T * which according to this page: http://www.scooterhelp.com/serial/ves.frame.serial.numbers.html makes it a 1963 Vespa 125 (VNB). The same page lists the 1963 Allstate VIN as VA12T*.

I point all of this out to show the various means to verify the model and year of an old scooter like this. Now I need to get the cables attached so I can go ride it.

Thanks to Sean Lynch for pointing me down this path.

Wednesday, July 4, 2012

Guest Post #1


Hey!
So I was asked to do a entry about my Cecilia. I started a post on reddit.com and shortly after asked to write a blog entry here. Well here I am.

The year I gotten my 1974 Vespa 50 Special, was 2007. I had been looking for a mode of transportation the beginning of the year looking at old Porsche 914's to an old Opel gullwing. At one point during that whole searching for a car, my dad dropped the small idea of a scooter that later on blossomed into reality. So skip ahead a few weeks and I started to look for scooters as well. You know, Kymco and all the other asian scooter manufactures. When one day I got an e-mail with the picture of Cecilia and a couple of sentences saying that my dad wanted to look at her no matter what and that I should come since it was for me who he found the scooter for.
So we hoped in the car on a friday and started driving from CT to NJ. It took us about 2 hours one way. After arriving at the elderly mans house I bought her for a steep price. I didn't care I had a scooter.
Once I had her home my dad and I started to do a full inspection and figured out what we had to do.
The first thing I remember doing was getting rid of the old gas that had been in the gas tank for at least over 1 1/2 years. And I tried cleaning as best as I could. Then we did the usual things such as spark plugs, Cables, Oils, Lights and the Tires. After a few weeks of repairing her I finally could drive her.
And boy was I excited.
I have to admit the first time I saw her I didn't like the way she looked at all. But I got her since she was old and unique looking with the green color. Forward ahead...
When I had her running the only trip I took was from my house to the local beach. Which takes about ~10min.
That year nothing bad happened except the once in a while stalling from the carburetor getting dirty since there was residue from the bad gas still in the tank.
The following year I gotten a job at a yacht haven as dock staff. And that trip took me a good 20min. But I didn't mind got paid well for what my hours were.
Now 2008 was not a great year for her. That was the first time I got hit while riding.
I was coming down this relatively small hill that merged into a roundabout. I had a yield sign and then to my right was a over pass with a stop sign. I went into the roundabout and before I knew it this white car clipped my front tire making me fall and scratch up most of my scooter. The driver only slowed down a bit but never stopped they just kept going.
So I had to pack everything that was lying around and drove home to hear a my mom tell me how bad it is to own a scooter. At this point I completely understand from where she came from.
I ordered the parts that I needed online and had my dad take the side panel to his work where the workers where kind enough to re-paint that panel for me.
Than nothing bad happened to her for a while except the routine maintenance.
 So at that point I started to take my scooter to High School and back and eventually I took her to my local community college.
Again nothing major happened to me except running out of gas once in a while or having to low oil.
Then last summer I tried to figure out why my rear break wasn't working that well as it used to be and I just thought it was because it was getting time to replace it so I wanted to wait a bit till I had time off from work and school.
So before I started any major work I wanted to take a trip to the beach before I couldn't ride her again for another few weeks. (that was a bad idea) Not in the break didn't work but a friend of mine persuaded me to let him drive her in a empty parking lot. I did. But at that time the carburator started to just increase in speed and I didn't know why. Turned out my friend played with the injector screw (forgot what it's called) and to top things off the kill switch decided not to work. Great. So I told my buddy who at this point had a scared look in his face to stall her in fourth gear. What did he do? He tried to stall her in 1st gear while the engine was screaming in high rpm and she just flew away under him into a brush thank god. A few scratches but nothing serious.
So once back at home and in safety of the evil lurking outside I did another inspection to see if something broke. And nothing did. Fast forward into this year and I finally came around on taking of the rear-back plate and replacing the break shoes when I saw that the gasket wasn't doing the job anymore and this rubber seal ring. I had a gasket still at home but not the rubber seal ring which I ordered online and took a month to come from Thailand. Put everything back together and it works again.
Now at the current state she is in everything works how it should for my purpose. I don't drive at night so it doesn't bother me that the headlight isn't working right now.
And that is about it. I am sure I am missing some things right now but I will add them if I remember them.
Sorry for the long read...

And finally here are some pictures of her:
http://imgur.com/a/RKmd3#8

Monday, July 2, 2012

Broken Auto Choke - Elite 80


I was removing the carburetor from the Elite 80 and pulled the auto choke. This part came out and the squashed spring stayed behind in the carb body. I'm going to have to replace it but I am not sure if I need the exact OEM or if a used one from another different bike would work.