Sunday, July 22, 2012

The Sticky Summer Months


This is my big blue truck I use to bring scooters home to work on. Have a closer look.   


It looks like it's just dirty and maybe it rained a little. 


This is Pecan sap. There are 8 huge pecan trees on the property where I live and one of them shades the area where I park and work on various scooters. This time of the year, right after the fig crop has finished, the pecan trees start dropping sticky sap everywhere. It begins with a light misting of sap. That's what is covering the surface of the truck in general. Last night, the trees starting dropping the big drops of sap you can see on the left. I wiped some away so you can see what it would look like otherwise. 

It's sticky enough that pebbles stick to the bottoms of my shoes. My arms stick to the truck if I lean agasint it and my jeans stick to the metal folding chair when I stand up. GROSS.


I'll point out again that there is NO WATER in these pictures. This is all sap.


 Luckily it washes right off with a spray nozzle on the end of a garden hose. I'll go get some small tarps today and get these things covered. Who needs a shop? I need a shop.

2007 Daelim Delfino 100cc


This was pointed out to me and I bought it very cheap. I would have assumed this was yet another Chinese scooter with questionable build quality. It turns out this was built by Daelim Motors from Korea whose parent company is Kia Motors. This is what it should look like new. It did not come with a top case.


Here it is after I pulled the back panels. Its 100cc 2 stroke engine is the same (possibly exact clone) of the engine in the Honda Rio and is also used by Kymco. It's my understanding that Daelim Motor company has been around since the late 60's and their scooter manufacturing is in partnership with Honda so the quality oversight ought to be pretty good. 

That said, this one is not running very well. It will idle just fine but it cannot move into a higher RPM range when the throttle is pulled. Here's a video showing it starting up and running. 


You can see it's running very rich and smoking. I checked the air filter for clogging but it's clean. I cleaned the carb and jets out for good measure. This model has a fuel pump which was unexpected (to me). I tried a different spark plug coil but the engine ran the same with the new one as well. We are narrowing in on the stator which generates AC power from the movement of the flywheel or the CDI unit which times the ignition of the spark plug. If the stator is bad, there may not be enough charge to fire the plug. If the CDI is bad, the timing of the ignition spark could be wrong causing the spark to fire at the wrong time during the stroke of the piston and the fuel would not ignite fully. 

I can tell this bike WANTS to run. It seems like a nice clean engine and this scooter would make a great riding companion to the Elite 80 I am working on as well. 

It's just parts. Parts make systems. If a system is failing, a part is failing and it's JUST parts. 


Saturday, July 21, 2012

Honda Elite 80 runs


My $100 Honda Elite 80 has been sitting in the driveway, naked, waiting its turn to be worked on and run. I picked it up as an afterthought while picking up a Honda Spree for a Spree racing league. It really looks like dirty hunk of junk, but I have had EXCELLENT luck with Honda engines and I had a good feeling about this one. After selling my Piaggio Typhoon 50, I have been wanting another little quick run around. 


The auto choke on the carburetor had basically disintegrated and left an open hole into the carb. I spent some time looking for a new auto choke but the ones I found on eBay specifically for the Elite 80s were pretty expensive. I wasn't sure if I could just use another one from another brand. I talked it over with my friend Steve and he suggested I just close the hole altogether. The auto choke is there to help the air fuel mix in cold weather. The only time it will ever get cold enough in Texas to actually need the auto choke to work, I will probably just stay inside anyways. I used some JB Weld and sealed the passageway. You can see the little grey blob of JB Weld there at the top. 


Here's a wider view of the engine and transmission. The starter gear is a little rusty but works. I will pull that out and clean and grease it. I put a battery in and tried to start it. The transmission didn't want to move. I thought for a bit it might be seized. I pulled the transmission case and rolled the flywheel with a socket wrench. It turned over and then moved easily with the socket. I tried it again with the starter button and the transmission began turning but it was obvious the battery didn't have enough charge to fire the starter enough to fire the engine. I put the battery on a trickle charger and pulled out the spark plug.


Using a stiff piece of wire poked down into the spark plug hole, I turned the flywheel until I could feel the piston was all the way to the bottom of the cylinder. Then using my modified funnel, I poured Marvel Mystery Oil down into the cylinder through the spark plug hole. I loosely replaced the spark plug to cap the hole. The Marvel oil loosens and disintegrates deposits on the sides of the cylinder and on the piston.

After letting the battery charge and the cylinder soak for a few hours, I removed the exhaust pipe from the scooter and held a rag over the exhaust port. I turned the flywheel and the Marvel Oil came spitting out of the exhaust. I did this until I could tell most of the oil was out. 

I replaced the exhaust, cleaned the spark plug with carb cleaner and sprayed some down into the spark plug hole and the reinstalled the plug. I sprayed a little more carb cleaner into the air intake of the carb and with the fresh battery back in, I tried starting it. It chug chugged for a bit and I gave it a bit of throttle. 

That old Honda engine fired right up and idled smoothly. There was a huge cloud of white smoke pouring from the exhaust, but like a baby crying when it's born, that's a great sign. The dissolved deposits inside the cylinder were being burnt off and blowing out as white smoke. It cleared out after a few minutes and I aired up the tires and rode it down the street. The neighbors are used to me racing up the street and back on a different scooter every other week. They just wave and nod now. Crazy white boy....

Saturday, July 14, 2012

Piece of Shit Chinese Carburetor - UPDATE: Settle down, Beavis...


After several hours of working on the cabling on the VNB, I FINALLY had it to the point where I could try and fire it up. I kicked it over a couple of times and then remembered I had not yet turned on the fuel supply. I turned the lever over and watched the fuel come down through the new transparent fuel hose and then down into the transparent plastic bowl. Then out the overflow and onto the ground. The float failed and sank. USELESS.

I am going to rebuild the original Del Lorto carburetor and put this thing back together as Enrico Piaggio intended!!

UPDATE: I was pretty bent after spending all day on this. Every day I learn a little more the incredible scope of what I don't know. First of all, this is an OKO carburetor which is Taiwanese not Chinese. (I hope no one thinks I am trying to be racist. I'm just ignorant from afar.) It is supposed to be a reputable brand although the thin brass on the fitting seemed real cheap. I found a replacement float online and to be honest have not examined the float to determine why it isn't floating. (it's called a FLOAT! Why wouldn't I expect it to FLOAT? ) I like the design of the carburetor. I like the clear plastic bowl and the easy access to the jets through the bottom. I like the slide machanism. There is some thought behind this thing.

I still have a concern about the throttle cable clearance under the engine cowl. In the long run, the aftermarket carburetor might not work for the scooter simply for just not fitting. Maybe I'll just stick it in something else.

Stop, Cable Time


The Vespa VNB came (to me) with an aftermarket Chinese carburetor and pod filter. It also came with a cable already attached. 

I am generally wary of Chinese parts (I'll show you why in a bit) due to inferior materials and known QA problems. However, I don't want to be a hater and I am willing to at least this one a go. The original carb is still in the treasure chest that came along with the bike, so I can always go rebuild it. 


This carburetor has a slide rather than a butterfly valve as many other carbs do. When then throttle is turned, the cable pulls the slide up and the spring returns it. 


At the bottom of the slide is the needle which allows fuel to flow through the main jet when pulled by the throttle. As you can see through the little keyhole in the middle of the slide, the cable stop is tucked into a little slot and then wedged in with a plastic cap. 


The other end of the cable is open ended (there is no stop on it). 


The original Vespa carburetor had the open end at the carb not the handle. The end of the cable loops through the little hook and is fastened back on itself.  


Here's a shot of the throttle handle inside the headset. It requires a cable end like the one below to fit into the circular hole.


So the problem here is that the cable for the new carb has no stop on the handlebar end and the old cable has no stop at the carb end. I need stops at both ends for this to work and this is where I hit a wall. How do you add a stop to the end of a cable? I didn't think a crimp on stop would be strong enough for a hard-pulled throttle cable. 


I found one of these screw down stops in a box of small parts and tried it out in the throttle handle. It fit through the hole but it was aluminum and had stripped out. I decided I would try this option out and went looking for some options. 


I found a variety pack of them at an auto store, but even the smallest one was slightly too big for the hole on the throttle handle. The stop on the far left is the stripped out aluminum one. The brass one next to it and the one on the far right are the same size. 


I used a file and some vice grips to file the outside of the stop down. I made several runs out to the scooter to test the fit. I would have just sat out there but it's Texas and it's cooler inside. 


The hole for the cable was too small so I used a 3/32" bit to drill out the hole. I used the vice grips to stabilize the whole operation. My next shop is going to have a table vice. 


Here is an up close comparison of the modified stop. 


I think this will do the job sufficiently. Now the trick is getting it installed in the tiny space inside the headset. It will definitely work but there is some tedious fiddlefucking that will need to happen first. 


On Chinese parts,
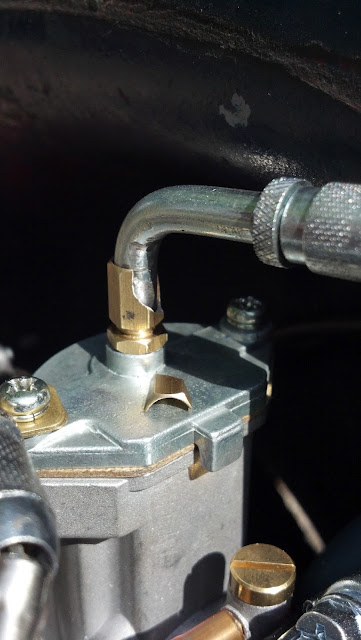
This probably should have been part of the last post about putting in new cable housing but here it is. When I was pulling the slack out of the new throttle cable housing, the tension against this brass fitting on top of the carburetor caused it to break. This should not have happened. It calls into question all of the materials on the whole assembly. I will see if I can find a sturdier replacement as this will most likely fail in the future (although this is a fairly stable connection point) but it's tempting to throw the whole thing out and reinstall the original Del Lorto carburetor.  I am not trying to indict Chinese products on the whole but when your safety at speed depends on the stability of the materials your bike is made of, this sort of failure can be disastrous. 


Housing Project... Hmmm that doesn't sound right...


I am working on the Vespa VNB and trying to resolve cabling issues. I saw that the housing for the throttle cable was in pretty crap condition. I knew there were some new cabling housings in the box of parts they came with it so I got one out to see how I was going to thread it through the body and up and out the headstock.


I dug out a long coil of regular wound 1/16th cable from a previous project. Then I pulled the original throttle cable all the way out of the housing and set it aside. 


I started with a cable stop. I threaded the cable through and let it slide loose. Next I ran the cable through the new housing and then up through the original worn housing. 


The idea was to pull the original cable out the top of the headset while pulling the new cable housing behind it in to place. I tightened the cable stop just below the bottom end of the new cable housing. Keeping a firm pressure on the cable out the top, I pulled the old cable housing out of the headstock and with a little of the old back and forth, pulled the new housing right into place. 


The new cable housing pulled through along the same path as the old and popped right out into place. I pulled the long cable back out of the housing and was able to push the new cable up from the carburetor through the new housing. 


Here's the new cable poking through and I now have a new issue to figure out. I needed a proper stop on the end of the cable for it to work with the throttle handle. 


You can see the open ended cable pointing towards the camera. To the left is a short arm connected to the throttle tube/handle. The cable stop fits into the circular hole and is pulled as the tube turns clockwise. The cable stop needs to be very robust to deal with the forces exerted on it every time the throttle is turned. 

I'll show you my solution to that in the next post. I had one giant post going but decided housing replacement and adding a cable stop were two different jobs so I split it up. I will have that up soon. probably tomorrow.

Thursday, July 12, 2012

Vespa Engine Stand


I needed an engine stand and being the handy sort of person with tools and scrap wood lying around, I couldn't bring myself to buy one of those fancy $175 welded jobs. I built this one in about an hour. It might have taken me less time if I hadn't stopped in the middle to fix a friend's paper shredder. 


On this end, the front leg is shorter to allow the crossmember and therefore the weight of the engine to rest on it. I had to file the hole in the aluminum piece because I couldn't find a 5/16 or 1/2" drill bit. Probably time to go buy a new set of bits.


The engine wants to lean towards the flywheel side so I added the little metal bracket on the right to hold it tight in place. 


This is the shock absorber mount side of the stand. I had to cut the chunk off the left side to accommodate the rear brake lever. Gravity holds it down and the bolt prevents any lateral movement.


This stand is very stable and holds the engine well in place. There was no cost for the scrap materials I had lying around. The engine for the Vespa Super 150 I am painting is sitting lopsided on a table so I may go build another one of these. I bet the second one looks nicer!

Tuesday, July 10, 2012

Guest Post: Me and my Ruckus

I'm Rob, I own a Honda Ruckus.  William has given me the opportunity to do a guest post on this blog which I am very happy to do.  Without further ado, here's the story of my Ruckus.

After living car free for three years,  I decided I would finally pick up a scooter.  I knew nearly nothing about them, but I knew I wanted a Honda Ruckus.  Nothing looked like it, and it looked like nothing else.  I loved the side profile photo on Honda’s website, even 100% stock they were unique.  Like anything with an engine, people have been modifying them for style, performance, utility, or a combination of those.  The tuner/tinkerer in me loved that about the Ruckus.  In July 2010, without ever having ridden a motorcycle, I rode mine home from the local dealership.

The mods came soon... after about 200 miles I already had a new rear shock and variator.  I was now able to get 45mph and could go over bumps without bottoming out.  Other mods came over time,  aftermarket CDI, kevlar belt, intake, exhaust, new handlebars, windscreen and more.

There’s a great satisfaction in squeezing more power out of a 50cc 4 stroke.  It’s very easy to do modifications that make you go slower rather than faster.  For me, performance modding was a very slow and deliberate process for this reason.  You have to get very comfortable with jetting, listening to the bike, and reading spark plugs.  It’s a skill you have to hone, it takes time, but it’s very rewarding.

On the main Ruckus forum, totalruckus.com, there’s a saying: Rider’s Ride.  With that in mind, I decided I would only do mods to my bike that increased performance or usability, and would do no mods that took away from those aspects.  I ride nearly every day, keeping it reliable is the most important goal.  Also important is being able to carry a load a groceries from the store.  This is why I’ve retained the stock plastic floor board that most people discard right away.  

I’ve been on a lot of group rides.  There’s the impromptu group rides with other Ruckus owners, the regular rides we try to schedule each Wednesday, or the giants rides as part of local scooter rallies.  My most memorable ride by far is the 455 mile round trip I made to the Mexican border and back.  It took me 8 hours to get there, and 10 to get back.  The trip took a toll on me, but the Ruck took it in stride.  

On the road to Mexico.

I like the Ruckus because it gives you absolutely everything you need, and nothing you don’t.  You get a scooter with nearly no amenities.  No fuel gauge, no storage, no disc brakes.  You get a scooter and not much else.  Because of its raw styling and basic construction, it serves as a blank canvas for the owner if they choose to modify.  Swapping engines is more or less a bolt on affair if you purchase the right mounts.  You can stretch them, add chrome, backrests, new handlebars, headlights, tail lights, and much more.  And if you choose to leave it stock?  Well you still get a uniquely styled scooter that will get you 100mpg every time you ride it.  

I could have easily bought a faster scooter, or one with storage space, but I don’t think anything can compare to my Ruckus.  It catches looks everywhere it goes.  Other motorists aren’t quite sure what you’re up to... but they have a feeling it’s illegal.


As it sits now... but for how long?

Sunday, July 8, 2012

Insta(fetish)gram


Instagram uses new technology to recreate crappy old technology. Here's a brand new, old looking picture of a newer model of an older brand. Looks awesome!

This Tractor Seat


I used to joke that I didn't want a tiny little seat on my bicycle, I wanted one of those big metal tractor seats. A decade and a half later and the big metal tractor seat has appeared in my life. I had it sandblasted and then I polished it with an orbital sander and some 220 grit. It's gorgeous and the stamped metal is certainly in the spirit of the metal bodied Vespas.

So the idea is to have a bracket fabricated and try and use it as a saddle for one of the Vespas. It really isn't ALL that different from the single saddles like the one on this bike:


I envision a plate that lines up with the current mounting holes with another plate that is connected to it by a hinge in the front and springs in the back. The seat itself would attach to this top plate with a single short bolt.  A line of holes up the middle of the top plate would allow for a minor amount of seat adjustment forward and back.

I am just not sure how I might go about working that out. Maybe I will bug Scooter Steve about it.

I will point out that I have brought this idea up in a couple of different forums and I had many people suggest that the bare metal seat would be disastrous to my coccyx and spine and that I should pad the thing. This of course, would defeat the whole purpose of having an awesome bare metal seat. I am going to try it out anyways if I can figure out how to get the bracket made. I am sure a mile or two ought to give me a definitive answer.